Expert Flooring Care Services
- Flooring Care Services in Las vegas
- Grow your Airbnb business with a professional turnover service
- Seamless booking and track your cleaning’s progress in real-time
- Try it risk-free with Happiness Guarantee
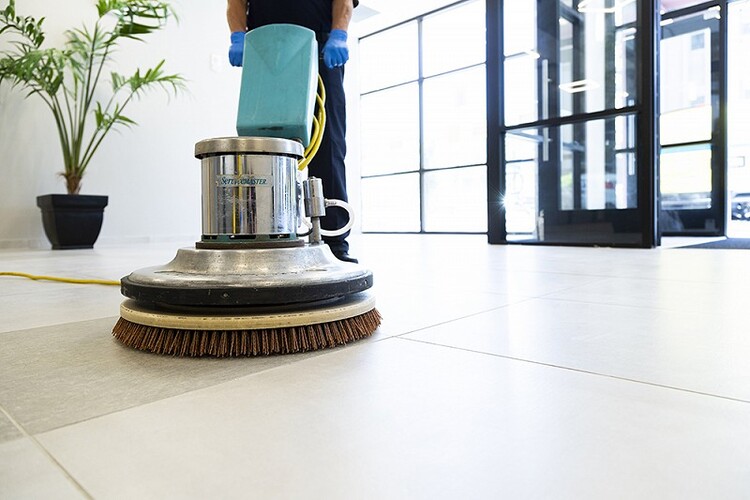
Why you need on-demand Flooring Care Services?
Clean, shiny and well maintained flooring can create a welcoming environment to your future clients or anyone else that walks into your building. Over time however, flooring may begin to lose it luster becoming dull and even discolored. When this happens it is time to strip the old wax finish and apply a new coat of wax to the flooring. Not only does this make your flooring shine, but it more importantly protects it. Here are 10 steps to strip and wax your floors.
STRIPPING THE FLOOR
Choose the best stripper for your floor type. Not all floors are created equal. Before you begin it’s often best to check the manufacturer’s instructions on whether the stripper is best suited for resilient or non-resilient floor types. Worldwide Janitor offers a wide variety of different commercial floor strippers.
CLEAR OBSTACLES
Once you have selected a commercial floor stripper, you want to clear the affected area of any desks, tables, rugs and anything else that could be in the way. Once all the furniture has been removed, sweep and inspect the tile. Be sure to remove anything you see stuck on the tile such as stickers, gum or tape.
CONTACT DETAILS
VEGAS AIRBNB HOUSEKEEPING SERVICES
CALL US: (725) 231-0088
Business hours: Monday to Sunday 7 am – 11 pm
Location: Las Vegas Henderson NV
Website: vegasairbnbhousekeepingservices.com
OUR SERVICES
-
Recurring Cleaning Service
-
Occasional & One Time Cleaning Service
-
Move Out & Move in Cleaning
-
Apartment Cleaning
-
Special Event Cleaning
-
Housekeeping Services
-
Commercial Cleaning
-
Office Cleaning
-
Building Cleaning
-
Store Cleaning
-
Shop Cleaning
-
Flooring Cleaning
-
Warehouse Cleaning
-
School Cleaning
-
Moving Cleaning
-
Standard Cleaning Service
-
Airbnb Turnaround Service
-
Deep Cleaning Services
-
Move-in/Move-out Cleans
-
Add-ons to any Clean
-
Post Construction Cleans
DILUTE PRODUCT
Always follow the directions on the bottle for proper dilution level. Once you have successfully mixed the stripper, you want to test it in a small corner or a place that is not as visible. If the stripper bleeds or discolors the floor, the solution is either too strong or your need to change to a different type of stripper.
APPLY STRIPPER
Pour floor stripper into a mop bucket and begin to apply it to the floor by flood mopping. Liberally mop the selected area with the floor stripper. It is important to not let the floor stripper dry on the tile. Once you have mopped the selected area, allow the stripper to dwell for 5-10 minutes. Also, if you will be using this same mop bucket for anything other than floor stripping, you may want to use a plastic trash bag as a liner to avoid cross contamination.
FLOOR SCRUBBER
After the product has been allowed to dwell, proceed to scrub off the old wax. This can be done either manually or by an electric floor scrubber. Some areas, such as corners, receive less traffic and thus have more wax build-up. Make sure to take your time in these areas as to remove any build-up. As you are scrubbing the floor, you will notice the area will start to appear duller and duller.
DISCARD REMAINING WAX
RINSE
It is important to rinse the floor with a neutralizer after the wax has been stripped. This will ensure the complete removal of any remaining residue or stripper. Chameleon Floor Prep/Neutralizer is a great neutralizer, even changing colors to indicate whether the floor is ready for waxing. After you have rinsed the floor with the neutralizer, once again use the wet/dry vac to suck up the remaining water. This is an important step as any remaining stripper on the floor will result in the wax peeling off later. Rinse the floor twice more using wet/dry vac to suck up the solution.
COMPLETION TEST
Before you are ready to begin waxing your floor it is beneficial to conduct a test to ensure all wax and residue has been removed. There are two ways to check if all the residue has been removed. First, before the floor is allowed to dry, place a black or dark colored towel on the floor. If white residue appears on the towel this means not all has been removed by the stripper. These areas may need to be treated again. For the second test, allow the floor to dry and then lightly pass a putty knife over the flooring. If any wax if found on the knife, you may need to re-strip these areas.
APPLYING WAX TO FLOORING
Wax sealer. After the floor is completely dry, fill the mop bucket with wax sealer. Again, to avoid cross contamination between products, it is often best to use a plastic trash bag as a liner for the mop bucket. From there, apply the wax to the flooring. Unlike applying the stripper, be sure not to flood the floor area. Rather, apply a thin and even layer of wax across the floor. Allow to dry. Dry time can vary on different products, but generally wait 45 minutes between coats.
APPLY ANOTHER COAT
After the wax has been allowed to dry, test a small area before walking out onto the wax as this can leave footprints in the wax. If the floor is tacky or even slightly sticky, avoid walking on it until completely dry. Apply as many coats as desired or needed allowing the appropriate dry time in between coats.
Ceramic tile floors are a popular flooring option. They’re durable, but like all floors, they need care and cleaning. Here are some smart tips on how to clean tile floors.
Sweep or vacuum your tile floors a couple of times a week. Sand and grit can dull and scratch the surface. Once you’ve removed the dirt, you’re ready to mop. Mix a mild detergent with hot water and apply with a rag or chamois mop instead of a sponge mop. A sponge mop pushes dirty water into the grout and soils it. Change your bucket of cleaning solution often so you won’t have a dirty mop that leaves a cloudy film of dirt on the floor. If you do end up with a hazy film on your tile floor, remove with an all-purpose cleaner. Make sure it’s non-abrasive so it won’t scratch the floor. You can also make your own cleaner by mixing lemon juice or vinegar with hot water. Apply it to the floor and then buff dry with a clean cloth. You can use a towel that you push over the floor with your foot.
OUR SERVICE AREA
Cities: Henderson, Las Vegas NV 89109, North Las Vegas, Boulder City, Pahrump Nevada
Las Vegas neighborhoods: Aliante, Anthem/Anthem Country Club, Chinatown, Downtown Las Vegas, Green Valley, Lake Las Vegas, Las Vegas Country Club, MacDonald Highlands, Mountain's Edge, Paradise Palms, Queensridge & One Queensridge Place, Seven Hills, Southern Highlands, Summerlin, Summerlin South, The Lakes, The Ridges, West Las Vegas NV
Service Area Zip Codes: 88901, 88905, 89101, 89102, 89104, 89106, 89107, 89108, 89109, 89110, 89116, 89117, 89124, 89125, 89126, 89127, 89128, 89129, 89130, 89131, 89133, 89134, 89136, 89137, 89138, 89143, 89144, 89145, 89146, 89147, 89149, 89151, 89152, 89153, 89154, 89155, 89157, 89158, 89161, 89162, 89163, 89164, 89166, 89185.
Best cleaning services in Las Vegas Henderson Nevada
LAS VEGAS JANITORIAL SERVICES
phone no: (702) 329-1040
Website: janitorialserviceslasvegas.org
CSN CLEANING LAS VEGAS
phone no: (702) 551-2023
Website: cleaningserviceslasvegasnv.com
MGM HOUSEHOLD SERVICES
phone no: (702) 530-7597
Website: mgmhouseholdservices.com
LAS VEGAS HOUSEHOLD SERVICES
Phone no: (702) 843-0512
Website: lasvegashouseholdservices.com
AONE CLEANING LAS VEGAS
phone no: (702) 843-0518
Website: vegashousekeepingservice.com
MGM CLEANING LAS VEGAS
Phone no: (702) 843-0589
bestcleaningcompanyvegas.com
PRICE CLEANING SERVICES LAS VEGAS
Phone no: (702) 680-2590
Website: maidservicevegas.com
VEGAS CLEANING COMPANY
phone no: (702) 843-0518
Website: cleaningservicesvegas.com
VEGAS CARPET CLEANING
phone no: (725) 218-0406
Website: carpetcleaningvegas.org
PRICE CARPET CLEANING LAS VEGAS
Phone no: (725) 218-0406
Website: Lasvegascarpetcleaning.org
CARPET CLEANERS OF LAS VEGAS
phone no: (725) 218-0406
Website: Bestcarpetcleaningcompanyvegas.com
VEGAS COMMERCIAL CARPET CLEANING
phone no: (725) 231-0031
Website: commercialcarpetcleaninglasvegas.org
VEGAS AIRBNB HOUSEKEEPING SERVICES
Phone no: (725) 231-0088
Website: Vegasairbnbhousekeepingservices.comg
One of the most important things in knowing how to clean tile floors is keeping the grout clean. Dirty grout equals dingy-looking floors. Grout is porous and easily absorbs dirt, grease and other materials. Spray the grout with a commercially prepared grout cleaner. You can also use a mild bleach solution. It’s a good idea to wear gloves when using these types of products. For deep stains, allow the cleaner to sit for 10 minutes. Use a toothbrush or other small scrub brush to scrub the grout.
For stubborn grout stains, mix a paste of baking soda and water. Apply it to the stain, let it sit overnight and then scrub with a nylon brush. Don’t use a metal brush as it will scratch the tile. Let the grout air dry, then put on a silicone-based grout sealer to resist future stains and dirt.
Here’s how to clean ceramic tile that has been stained. For coffee, tea or juice stains, wash the tile surface with hot water and detergent, then blot with hydrogen peroxide. For grease stains, wash with club soda and water, or a commercial floor cleaner. For ink stains, soak a cloth in diluted bleach and lay it on top of the stain. Leave the cloth until the stain is gone. Rinse thoroughly when done.
Knowing how to clean ceramic tile floors properly will keep them looking lovely and help them last for years.
Service Area
- Las Vegas NV Flooring Care Services near me
- Boulder City NV Flooring Care Services near me
- Enterprise NV Flooring Care Services near me
- Henderson NV Flooring Care Services near me
- North Las Vegas NV Flooring Care Services near me
- Paradise NV Flooring Care Services near me
- Spring Valley NV Flooring Care Services near me
- Summerlin NV Flooring Care Services near me
- Sunrise Manor NV Flooring Care Services near me